Posts

Showing posts from May, 2018

Craftie Cafe: Monster Sized Take #2 (with Video Tutorial)

Image
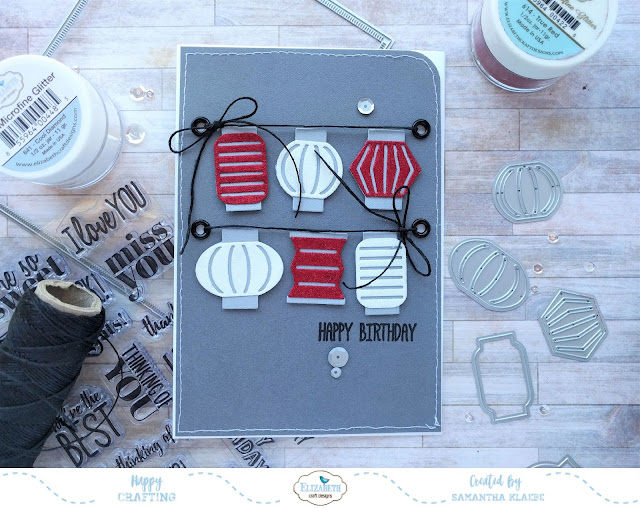
I’m back sharing a second card I created using My Favorite Things – Monster Sized stamp set. If you didn’t see my first card – check it out here. For this card I decided not to do any colouring! Instead I opted for bright coloured card and a fun black and white background. Here is my card: These monsters are super cute! Since I’ve been getting a lot of positive feedback about how I create my backgrounds I decided I would video the process. VIDEO SUPPLIES LIST: Craftie Café   MFT – Monster Sized MFT – Make Your Mark Background Stamp Lawn Fawn - Stamp Shammy Foam Dots Scorer Other: Tape Runner Scissors/Paper Trimmer White Card Base Cardstock Cuttlebug Twine – Black MISTI Versafine Black Onyx Ink Sewing Machine  Craftie Café Thanks for stopping by! You can grab both these (in stock) items at Craftie Care ! I hope you enjoyed my video tutorial – check back in a couple of weeks for some more card inspiratio

Elizabeth Craft Designs: LadyBug Birthday Wishes

Image
Hello everyone!  I (finally!) got the chance to play with Elizabeth Craft Designs Silk Microfine Glitter. I loved it so much that all my cards this month for ECD will feature it! Here is my card using their lady bug die. Though it’s a clean and simple design I’ve added texture and sparkle to create a fun birthday card. Craft Supplies Used: Elizabeth Craft Designs: Lady Bug die General Sentiments Stamp Velvet Adhesive Sheets Silk Microfine Glitter - True Red Double Sided Adhesive - 2.5" Soft Finish Cardstock - white Dashing Rectangles Die Other: Black cardstock Red cardstock Versafine Black Onyx Ink For detailed step by step instructions check out the original blog post on the Elizabeth Craft Designs blog - here . Happy Crafting!

Ink Road Stamps: Friday Feature

Image
Check out this weeks Friday Feature on the Ink Road Stamps blog - here! So much fun creativity using The One With All The Stamps stamp set! (Bit of a mouth full...but as you can see there is quite a bit of stamps in this set!) At first I wasn't sure how I could properly create a card that showcased all these stamps! It then hit me to just use the whole stamp set as a background stamp. Which is exactly what i did. I used double sided tape and adhered the plastic (stamps facing down) on the bottom side of my MISTI and stamped it on purple card. I created my own cut design using the 'frame' as a guide which I then cut (with my silhouette) using gold card. The 'I'll Be There For You' heat embossed in gold was the perfect sentiment for this friends themed card!  I ended up creating two cards, both very similar. The second card was actually a mistake - the frame I first cut using my silhouette was too big but after I had made the first I really didn't 

Ink Road Stamps: You ARE Lovely

Image
Hello!!! Any Ink Road Stamp - Full Circle fans reading my blog today?? This layout is probably one of my favourites - I use this 'grid' layout quite a lot but what I love most about this card is how I've taken each circle stamp and mixed them up to then create a fun, perhaps a little crazy new circle within my grid layout... Here is my card:  If you would like to know step by step instructions on how I created this card - check out the original blog on Ink Road Stamps - here . Simply put - I basically stamped the full circle patterns on die-cut circles which I then cut in half. I then mixed them all up and adhered it next to a different pattern stamped (half) circle. I added machine stitching and sequin stars.  The sentiment is from Ink Road Stamps: Majestic AF . I created a second card - same layout different colours. This colour combo is probably my favourite out of the two. I love how vibrant these colours turned out! Which colour co

Elizabeth Craft Designs: May Challenge

Image
It's another Challenge over at Elizabeth Craft Designs . This was a very much welcomed challenged for me...I finally got to play around with their silk microfine glitter. Here is the card I created for this months challenge: All That Glitters I used Elizabeth Craft Designs: Daisy die and a combination of glitter from their newly release Earth Palette pack. I also added the banner sentiment and die to complete this card. As you can see I added glitter to certain areas of the flower and highlighted the ends of the banner. Check out a few of Elizabeth Craft Designs video tutorials - they have a great resource of information on how best to use their glitter.  If you'd like to see more glitter inspiration - check out more craft projects created by the design team . ECD Supplies used: Stamp Set - Banner Sentiments and Dies Clear Double Sided Adhesive: 3mm/6mm/5"x12"sheet ECD - Daisy die ECD Glitter: Earth Pack , Spring Peridot Other: Versafine

Elizabeth Craft Designs: New Release

Image
Elizabeth Craft Designs have another release of fabulous dies and stamps...They recently also released some new glitter packs which I've also had the chance to play with for this month - so you'll notice that many of my cards I share in May will have a touch of glitter somewhere on the card! This card was created using Josets new designs. I went quite traditional using red and white to create rows of lanterns. I added twine to make them appear like they are hanging from something. Since this was the first time using glitter I went on a little search on how best to use this for my card. I didn't have to go far Els has a whole bunch of video inspiration on how to use Elizabeth Craft Designs microfine glitter... you can check them out here . Supplies Used: Elizabeth Craft Designs - Party Lanterns Silk Microfine Glitter - True Red/ Cool Diamond Cear Double Sided Adhesive Soft Finish Cardstock - Pewter/Silver Grey/White Elizabeth Craft De

Craftie Cafe: Scream! It's Your Birthday!

Image
It’s that time of year where I seem to be entering the 'birthday' season. I’m even writing this after I spent the afternoon celebrating a 4   year old's birthday party and I’m pretty sure hers is the start of many…including my own three children who will be celebrating their special day a few months apart from each other… So with lots of little kids’ parties on the horizon it’s time to smash out some kid themed birthday cards! Here is what I’ve come up with (for Craftie Café ) using MFT – Monster Sized stamp/die set. The monsters were stamped, coloured (with Copics) and die-cut out before I put them aside to work on my background. The background was cut out strips of corrugated card mixed with black and white strips of card that I had run through an embossing folder (or two) before sewing them back together to create a fun textural effect. I then heat embossed the sentiments in white on black card and assembled my card as shown in the photo above. I used the star s

Jane's Doodle's: Unicorn's & Rainbows

Image
Today I have six cards to share with you...that's right SIX! It may feel a little 'it's been done before' but I really couldn't help but pair this Jane's Doodle - Unicorn set with rainbows... Here is the first card: I coloured the unicorns with my Copic markers - keeping to the rainbow colour scheme. They were cut out using my silhouette cameo, along with the clouds and stars in this stamp set. I've used a number of dies to create the background. The rainbow is My Favourite Things . The tiny stars, hearts and bows are Avery Elle. The BIG cloud is a Mama Elephant die. I also added a slider die - this one comes from Lawn Fawn. As you can see in the photo below I also added a few extra 'bits' to add dimension and texture to this card. I've used a lot of glitter! Glitter paper, chunky glitter (Unicorns wings and Clouds), glitter pen, and Stickles -Gold (Unicorns horn). I used glossy accents for the cloud and stars. Added My Little P