Posts

Showing posts with the label Machine Stitching

Elizabeth Craft Designs: Masculine/Father's Day Card

Image
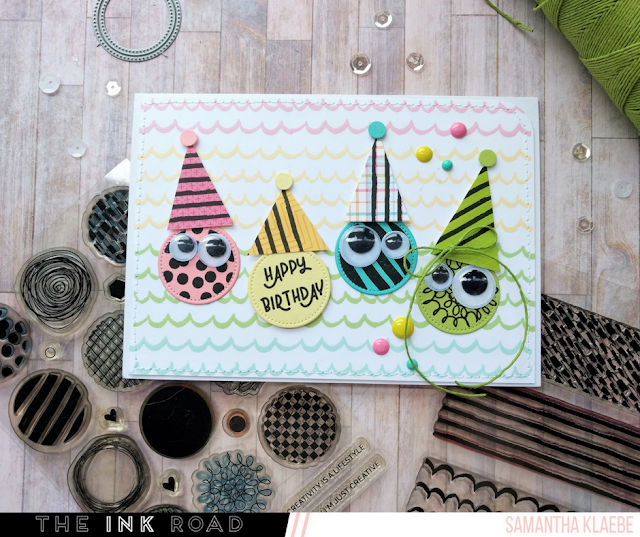
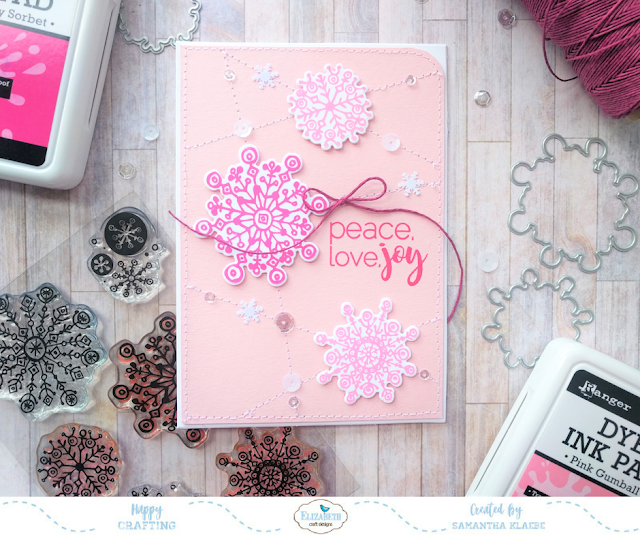
Hello and Welcome! Elizabeth Craft Designs are showcasing Masculine/Father's Day cards on their blog! Here is my take on this months creative theme. I decided to turn them in to birthday cards - but these are such a gender neutral design that you could put any sentiment on and it would work! I used Elizabeth Craft Designs: Geometric Background die along with Elizabeth Craft Designs: Your Day Stamp Set. I coloured the first card using Elizabeth Craft Designs: Watercolour Palette . Happy Crafting! Samantha

Uniquely Creative: Indigenous Journey Mini Kit

Image
Hello and Welcome! Today I'm sharing a card I created using Uniquely Creative Mini Kit (March) . This months kit contains a fun stamp set, two stencils and a few extra items that can be used for sentiments or embellishing a Scrapbook page. Here is the direct link for more details on whats included in the kits. I love that this kit included a few good masculine worded sentiments. Though the stamp set is inspired by indigenous designs - the set itself has a great geometric/pattern feel to it. Which for me is what I love and feel I best create with!   The card example above is one of four cards - I used red, orange and yellow to create my stamped focal points and connected the pattern by stamping the rest in grey and adding machine stitched lines. I embellished the card with a twine bow and some Uniquely Creative Enamel Dots.  Here is one more card example I'll share on my blog. For more inspiration on this months mini kit check out My Little Paper World o...

La La Land Crafts - Have You Heard? (Club La La Land)

Image
At the beginning of last year I said I wouldn't start another card kit or stamp subscription...but...towards the end of last year I came across a super cute club that I wanted to be apart of! La La Land Crafts has a fun monthly kit which comes with red rubber stamps and dies and today I'm sharing a few cards I created with my first kit (December).    Each card features the cute Panda Bear stamp/s and also includes the dies available in the subscription kit. I basically added card stock and a few embellishments to finish off each card. I decided I wanted to go really bright and colourful - a nice contrast to black and white bears.  My second card uses the negatives left over from the first card (I love it when I don't waste paper!). I of course added some stitching and coloured the bears in with Copic markers. Copic markers used provided below.  Supplies Used: La La  Land Crafts - December Club Kit  Card Stock Corrugated Card Copic Markers...

Elizabeth Craft Designs: Joset's Release (Go Wild!)

Image
Hello - It's January and with a new month comes a whole bunch of new releases! This one I'm especially excited about. Joset from Elizabeth Craft Designs has a beautiful release full of jungle critters and equally adorable accessories to complete each animal. Here is a card showcasing the new Monkey die and Jungle Leaves die. You can find all her new dies on the Elizabeth Craft Designs shop - here . There's a Zebra, Giffafe, Lion, even a Jeep! Seriously some fantastic designs to create fun jungle themed cards! I can't wait to show you more. Happy Crafting!

Ink Road Stamps: Mr & Mrs (Bella Flora)

Image
It's pretty much wedding season here in Australia - so I'm starting the year off using Ink Road Stamps Bella Flora to create this beautiful, monochrome white card. There is something very elegant and classy about white on white with a bit of gold! Head on over to Ink Road Stamps blog for full instructions on how I created with card.  I've had a few questions about how I got the texture on the fie cut flowers - it's not am embossing folder!... I have a rather large collection of corrugated cardstock. It' perfect for adding texture to cards especially when using dies.  I used Ink Road Stamps Block Party Alphas and Wow Embossing Powder (gold) to stamp and emboss the sentiment. Kept it Simple: Mr & Mrs. Thanks for stopping by and I hope you get a chance to try this very simple white on white technique using dies. I'll be showcasing all of Ink Road Stamps dies this month so keep an eye out on my next blog post for some die-cutting inspiration! ...

Ink Road Stamps: Full Circle Let's Party!

Image
I'm on the Ink Road Stamps blog sharing this fun card! Check it out - here . I first started by creating my stamped background using  Between the Lines . I stamped these using four ink colours I knew would work well together and in colours that I had matching paper to create my googly eyed circle characters with. You could try any combination of colours – I had even though red hats would make fun Christmas themed cards! Next, I die-cut four circles in co-ordinating cardstock. I used black ink and stamped three of them with a few stamps from  Full Circle . I stamped the sentiment from  Just A Number  on one circle and then adhered these to my card front. I don’t own any hat dies and I didn’t want to purchase a cut file so I simply cut out different sized triangles from pattern paper. These were also stamped (for added interest, using  Between the Lines ) and then adhered above each circle using foam tape. I then used a small circle punch for the pompoms ...

Elizabeth Craft Designs: October Designer Challenge

Image
It's another Designer Challenge over at Elizabeth Craft Designs. This release I am extremely excited about. I love everything Krista designs and this release is no exception! She's designed beautiful Christmas themed stamps (with co-ordinating dies). The release is now available and you can check out the design teams inspiration - here on the Elizabeth Craft Design blog. Here is what I created using the Snowflake stamp and die. I also did a blue version. Which do you like best? Supplies Used: Snowflakes Stamp & Die Classic Christmas Sentiments Double Sided Adhesive Tape Soft Finish Cardstock Other: Sewing Machine Sequins Twine Ink Foam Tape Tape Runner Scissors Paper Trimmer The question for this month: Which of the new Krista Schneider stamp sets would you use to create a Christmas card. If you would like a chance to win our giveaway, be sure to leave your comment on  TODAY’S Elizabeth Craft Designs blog post (here) ...

StickerKitten: Mermaid Treasures (Paper Tearing Part.2)

Image
Late last month I shared a blog post about paper tearing using StickerKittens Mermaid Treasure Collection Box . I made so many cards I decided to share these cards over two blog posts. If you missed the first blog you can view it - here . The first blog post included card instructions and a few tips on paper tearing. Its probably one technique I haven't used in the longest time but it works so well with this collection box . Supplies List:  Mermaid Treasures Collection Box  Mermaid Treasures Sparkly Sequins Mermaid Treasures Die-Cut Ephemera Mermaid Treasures Basics Paper Pack Mermaid Treasures Photopolymer Stamps (Birthday Fishes) Other:  Cardstock  Black Ink  Sewing Machine  Tape Runner/Gluedots/Multi Medium Matte  Paper Trimmer/Scissors Here are a few more paper tearing ideas and layouts that I came up with. I basically teared the majority of the paper packs to come up with different ways to pl...

StickerKitten: Mermaid Treasures (Paper Tearing Part. 1)

Image
Hello! Early this month I got my amazing Mermaid Treasures Collection Box from StickerKitten. As you can tell by the name it's ocean/mermaid themed and full of pretty embellishments and paper. It also has two stamp set which have the most adorable images. I've decided to split my blog post into two parts. One of the things I love most about StickerKitten's Collection Boxes is how easy it is to create card sets. I ended up creating seven cards (over 3-4 days) using one simple background technique and the Mermaid Treasure ephemera . I've included a step by step instruction for the first card and a few tips on what I would call a classic technique that anyone of any age could do: Paper Tearing. Here is the first card: Card Instructions: Step 1: Take three strips of pattern paper (measuring: 5cm x 10cm) and rip the bottoms off each one. Step 2: Adhere these three strips to the top of your cardfront as shown (Trim edges if necessary). (Cardfront m...

Ink Road Stamps: Start of Something New

Image
Welcome! Today I am NOT sharing a card! For the last few years card making has been all I've done. Many, many years ago I use to scrapbook and create off the page art - but with young kids I quickly decided it wasn't for me anymore and let my creativity fall into one area of card making!  I've been following a few crafty ladies whose traveling notebooks kick started my want to give it a try. Follow my original blog post - it has a few more details on how I created my first notebook page. Go to the Ink Road Stamps blog - here . Otherwise check out the photos below! I went a little overboard with the detailed photos - it was a little challenging taking photos of something other then a card. There are so many details - the stitching, glitter, stamping, embellishments. I wanted to capture it all. Supplies Used: Ink Road Stamps - Chin Up Buttercup Traveller's Journal Altenew Ink Silhouette Cameo Printer Sewing Machine Sequins Twine C...