Posts

Showing posts from September, 2018

Elizabeth Craft Designs: Santa and Friends!

Image
Good Morning! I'm starting to feel like the weeks are flying by and the months zooming past! Anyone else feel this way? I've been preparing for a market coming up in November - this will be my first market experience selling my cards. With that in mind I thought it would be good to add some fun, very cute Christmas cards to sell at this market. Here are three cards I've created with Elizabeth Craft Designs latest character dies. I started by die cutting the stitched rectangle card base and stamping the sentiments on the inner die cut rectangle. After I added a machine stitched border, I then adhered both these pieces on to a white card base. The middle rectangle fit back like a puzzle piece. The rest of the card was quite simple. I die cut the penguin using black, white, orange, and blue card stock. I assembled him on my card front and embellished the card with some die cut snowflakes, sequins and a twine bow.  Supplies Used: Santa Claus Penguin Polar

StickerKitten: Mermaid Treasures (Paper Tearing Part. 1)

Image
Hello! Early this month I got my amazing Mermaid Treasures Collection Box from StickerKitten. As you can tell by the name it's ocean/mermaid themed and full of pretty embellishments and paper. It also has two stamp set which have the most adorable images. I've decided to split my blog post into two parts. One of the things I love most about StickerKitten's Collection Boxes is how easy it is to create card sets. I ended up creating seven cards (over 3-4 days) using one simple background technique and the Mermaid Treasure ephemera . I've included a step by step instruction for the first card and a few tips on what I would call a classic technique that anyone of any age could do: Paper Tearing. Here is the first card: Card Instructions: Step 1: Take three strips of pattern paper (measuring: 5cm x 10cm) and rip the bottoms off each one. Step 2: Adhere these three strips to the top of your cardfront as shown (Trim edges if necessary). (Cardfront m

Ink Road Stamps: Start of Something New

Image
Welcome! Today I am NOT sharing a card! For the last few years card making has been all I've done. Many, many years ago I use to scrapbook and create off the page art - but with young kids I quickly decided it wasn't for me anymore and let my creativity fall into one area of card making!  I've been following a few crafty ladies whose traveling notebooks kick started my want to give it a try. Follow my original blog post - it has a few more details on how I created my first notebook page. Go to the Ink Road Stamps blog - here . Otherwise check out the photos below! I went a little overboard with the detailed photos - it was a little challenging taking photos of something other then a card. There are so many details - the stitching, glitter, stamping, embellishments. I wanted to capture it all. Supplies Used: Ink Road Stamps - Chin Up Buttercup Traveller's Journal Altenew Ink Silhouette Cameo Printer Sewing Machine Sequins Twine C

Craftin Desert Divas: September Release

Image
Hello - Welcome! It's September release time over at Craftin Desert Divas . All week the design team has been sharing their cards and inspiration using the latest fun holiday/Halloween themed stamps, stencils, and dies. If you've missed it come join in the fun over at Craftin Desert Divas Facebook Group . Here is one of my cards using the stamp set Doxie Duos which I paired with the new release stencil . I used Distress Oxide Inks - Picked Raspberry, Wilted Violet and Black Soot and a blending tool to outline the stencil.  After this dried I machine stitched the web details. I then adhered my stamped sentiment, and die cut grass. I then added more machine stitched details and embellished the web with Craftin Desert Divas Sequins.  After my card front was finished I moved on to colouring the witch Doxie and pumpkins. I coloured them in with my Copic markers and kept to similar colours used in my background. See below for colour combinations.   This was my firs

Ink Road Stamps: You Are Lovely!

Image
Hello! Here is a card I created using two Ink Road Stamps.  I decided to make my own bright rainbow using the Between the Lines stamp and a simple (yet always satisfying) technique I've used on many occasion: masking. The other stamp set used in this card is Majestic AF - another absolute favourite of mine. Here is my card: For complete instructions and original blog post go to Ink Road Stamps Blog - here . Here is another example of the card above. This card involved a lot more masking but I really love these unicorns and creating this rainbow. This card is a great example of how  thinking outside the box allows you to create with stamp sets that otherwise wouldn’t necessarily be used that way. I really wanted to create a rainbow and I found the perfect stamp for it! Happy Crafting!

Elizabeth Craft Designs: 'Tis The Season

Image
Hello & welcome! I'm on the Elizabeth Craft Designs blog with this very elegant Christmas card using the new release Snowflakes Border die. I decided to pair the die with Silk Microfine Glitter in some not so traditional Christmas colours. I added the sentiment from their Classic Christmas stamp and embellished the card with a twine bow and sequins. For full step by step instructions (with photos) check out my Elizabeth Craft Designs blog post - here . Supplies Used: Silk Microfine Glitter - Sky Glitter Palette - Bloom Snowflake Border Classic Christmas Sentiments Double Sided Adhesive Tape Twine Sequins Tape Runner/Glue Dots/3D tape Sewing machine Cuttlebug Grey Dye Ink Paper trimmer/Scissors Here are the two extra cards I created with this border die - I simply changed the border die orientation on my cardfront as well as the glitter colour and sentiment .   Which colour do you prefer? Do you like creating cards using non-traditi

Ink Road Stamps: SMS Collaboration Instagram Hop

Image
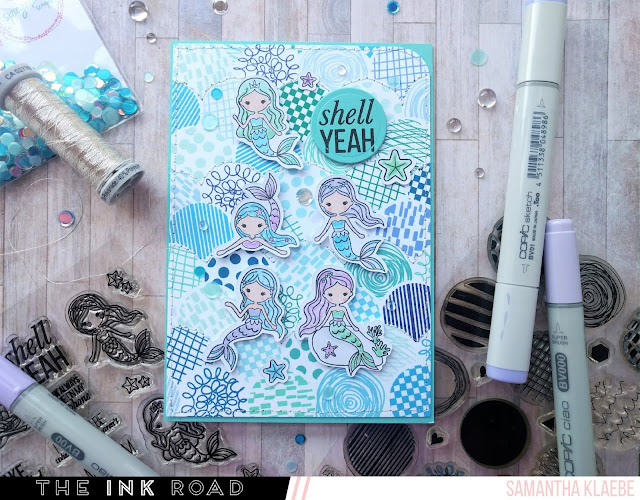
Did you miss the Ink Road Stamp / Spiegelmom Scraps Collaboration Instagram Hop ? (Wow - that's a bit of a mouth full!) I love Instagram hops - so much inspiration! Check out my card below - this was the card I created for the hop . The hop was to showcase the new Ink Road Stamp bundle featuring the Shell Yeah (mermaid themed) stamp set! I'm a huge mermaid fan - add it to the unicorn, llama, and robot stamp collection of themes I can't say no to! The mermaids were stamped and coloured in with Copic Markers. To create my background I used Ink Road Stamps: Full Circle and a simple masking technique which allowed me to create my scalloped looking ocean. I of course added machine stitching and embellished the card with sequins and acrylic bubbles (both available in the bundle).  Here are two additional cards following the same masking and stamping technique.  This card (below) is also on the Ink Road Stamps blog - with more details on how I created it

Elizabeth Craft Designs: September Designer Challenge

Image
Facebook memes keep reminding that Christmas is coming! Luckily I'm pretty organised this year. All the new Christmas released stamps, dies and recent Christmas themed challenges means I'm also all set and ready for Christmas card giving!  Here is my card for Elizabeth Craft Designs: Classic Christmas theme . This die is so beautiful! It's one of Elizabeth Craft Designs older releases - but I needed it, so I bought it! Putting up a Christmas tree has always been a tradition for me - and now with three young children it's even more special because it's the time spent with family putting up the tinsel, hanging the decorations, adding the star that makes the memories last forever.  P.S Our family Christmas tree doesn't look as good as the tree in this card...It's a very top heavy decorated tree to keep the two year old from removing all the decorations and hiding them! I thought it would be fun to reverse the colours a little. So here is