Posts

Showing posts with the label Masking

Ink Road Stamps: You Are Lovely!

Image
Hello! Here is a card I created using two Ink Road Stamps.  I decided to make my own bright rainbow using the Between the Lines stamp and a simple (yet always satisfying) technique I've used on many occasion: masking. The other stamp set used in this card is Majestic AF - another absolute favourite of mine. Here is my card: For complete instructions and original blog post go to Ink Road Stamps Blog - here . Here is another example of the card above. This card involved a lot more masking but I really love these unicorns and creating this rainbow. This card is a great example of how  thinking outside the box allows you to create with stamp sets that otherwise wouldn’t necessarily be used that way. I really wanted to create a rainbow and I found the perfect stamp for it! Happy Crafting!
Ink Road Stamps: SMS Collaboration Instagram Hop

Image
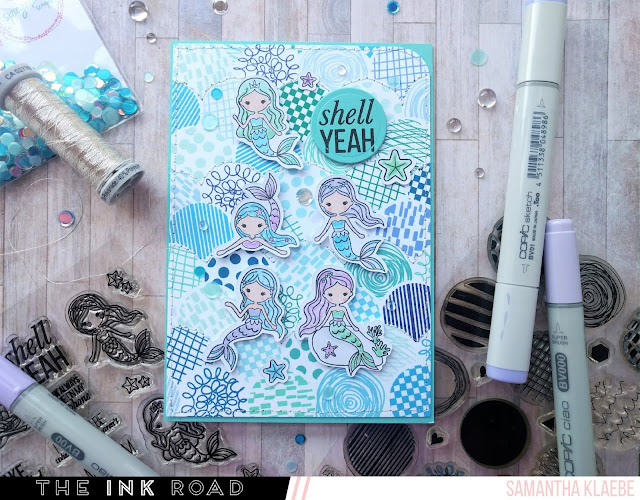
Did you miss the Ink Road Stamp / Spiegelmom Scraps Collaboration Instagram Hop ? (Wow - that's a bit of a mouth full!) I love Instagram hops - so much inspiration! Check out my card below - this was the card I created for the hop . The hop was to showcase the new Ink Road Stamp bundle featuring the Shell Yeah (mermaid themed) stamp set! I'm a huge mermaid fan - add it to the unicorn, llama, and robot stamp collection of themes I can't say no to! The mermaids were stamped and coloured in with Copic Markers. To create my background I used Ink Road Stamps: Full Circle and a simple masking technique which allowed me to create my scalloped looking ocean. I of course added machine stitching and embellished the card with sequins and acrylic bubbles (both available in the bundle).  Here are two additional cards following the same masking and stamping technique.  This card (below) is also on the Ink Road Stamps blog - with more details on how I created it...

Craftin Desert Divas: Sneak Peek Critter Punnies (August Release Week)

Image
Hello! It's August already!!! Which means it's release week over at Craftin Desert Divas . Here is my first sneak peak preview using Critter Punnies. Isn't this critter cute? I coloured him in with my Copic Markers (listed below) and simply adhered him above a mountain of stamped nuts which were individually stamped using a masking technique. I partnered the stamp set with Craftin Desert Divas Stitched Alphabet Dies. This allowed me to create my own personalised sentiment - a must have item in your craft stash! I used a wood effect cardstock to die cut the letters (I've had this in my stash for years and finally found the right card to use it with!). These were adhered with foam tape and I finished the card off with some punched out hearts, twine and enamel dots.  If you noticed I exchanged the 'O' in You with a nut - this is part of the new release die for August and I can't wait to show you more using this die!  Copic Markers Basket: YR04...

Ink Road Stamps: The unicorns made me do it...

Image
I'm rather excited to share these cards with you today... I absolutely love Ink Road Stamp: Majestic AF . This is the second time I've used the stamp set, this time partnering it up with Ink Road Stamp: Block Party Alphas .  The idea to create these cards came just before Christmas when I was stamping this card ( here ) I realised that the Majestic AF set would be perfect to recreate this card and that there were a number of sentiments that I could come up with using the Block Party Alphas .  So if you don't have alphabet stamps then I strongly believe you should add some to your collection - the possibilities are endless for creating your own sentiments!!! Card 1: The unicorns made me do it! Card 2: Keep calm and be a unicorn. To create these cards I used a simple masking technique using masking paper - but a post it would work just as well. It was a little tedious for some of the larger backgrounds but well worth it! I decided not to...

Ink Road Stamps: Dear Santa...

Image
Hoping to inspire you with some fun cards I very recently created using Ink Road Stamps latest releases -  Happy Holla Days as well as my favourite alphabet stamp set - Block Party . Now don't get me wrong I absolutely love the sentiments that come with this stamp set and I could have quite easily coloured in my Santa's and added any one of those sayings - but the one thing I've noticed in my craft stash (and I'm sure I am not the only one) is a large collection of unused (mint condition) alphabet stamps!!! So today I'm hoping that these cards will inspire you to grab those Block Party stamps and start creating your own sentiments - because the possibilities are endless. When I got these stamps and saw the Santa image I knew I had to partner it with this sentiment.  I first started by creating my background - which is a simple (yet long and tedious) masking technique using masking paper (or a post-it note if that's all you have).  I decided to leav...

Ink Road Stamps: Friday Feature

Image
(I'm a little late sharing this post - I thought I had scheduled it, but it obviously didn't happen as it's now Sunday!)  It's Friday Feature over on the Ink Road Stamps blog ! Here are my cards using the featured stamp set: #beautifulmess   I created three simple cards using a rainbow colour scheme. I though it fitting for the stamp set... Wanna see what other members of the Ink Road Stamp design team created? Check their projects out here . Happy Crafting. Samantha

Another Masking Tutorial!

Image
As promised I wanted to share another quick photo tutorial. Again using a mask this time with a stencil! This is such a great simple technique - and I do love getting the most out of my inks! So I made two cards using a stencil (Kaisercraft) and Distress Inks - Blueprint Sketch, Tumbled Glass, and Salty Ocean. I first cut some white card stock (canson) slightly larger than my rectangle die (My Little Paper World - Rectangle Nesting Die - TRIBAL) . I taped it down to my craft mat. Taped my stencil, where I wanted the pattern to go. Then I covered the top part (above the stencil) with white printing paper, taped this down. To make sure that I only got distress ink where I wanted the ink to go! Note: I've made many mistakes thinking that I could sponge the ink neatly and not get it everywhere!!! I've come to terms with the fact that I am a messy crafter who needs to take these extra precautions. I started with the lightest colour - ...