Posts

Showing posts with the label Heat Embossing

Ink Road Stamps: Mr & Mrs (Bella Flora)

Image
It's pretty much wedding season here in Australia - so I'm starting the year off using Ink Road Stamps Bella Flora to create this beautiful, monochrome white card. There is something very elegant and classy about white on white with a bit of gold! Head on over to Ink Road Stamps blog for full instructions on how I created with card.  I've had a few questions about how I got the texture on the fie cut flowers - it's not am embossing folder!... I have a rather large collection of corrugated cardstock. It' perfect for adding texture to cards especially when using dies.  I used Ink Road Stamps Block Party Alphas and Wow Embossing Powder (gold) to stamp and emboss the sentiment. Kept it Simple: Mr & Mrs. Thanks for stopping by and I hope you get a chance to try this very simple white on white technique using dies. I'll be showcasing all of Ink Road Stamps dies this month so keep an eye out on my next blog post for some die-cutting inspiration! ...

Craftie Cafe: You're A Rockstar!

Image
Today I'm sharing a card I created using Taylored Expressions: Cutting Edge Stars Stamp and Die Combo. These sets are great as they come with a co-ordinating die. After a practice colour attempt on the stars I really wanted to make them the feature on my card.  I opted not to use the die for this card this time, but will definitely use it on my next card! This is what I came up with: Card Instructions: Step 1: Stamp the stars four times and fussy cut. (If you have a silhouette or cutting machine use the scan and cut feature to cut the stars out.) Step 2: Colour in with Copic Markers. Step 3: Adhere stars to a black card front. Corner punch the top right corner. Measurement: 5" x 7" Step 4: Heat Emboss the sentiment. Step 5: Add a machine stitched border. (Optional) Step 6: Embellish with sequins and a twine bow. Adhere to a side folding card base. SUPPLIES LIST: Craftie Café Taylored Expression: Cutting Edge Star Stamp and D...

Elizabeth Craft Designs: Hello Sunshine!

Image
Last week I shared a card for Elizabeth Craft Designs monthly challenge using their Bee die and Hexagon die . Since I had used alternate colours (and I was having so much fun creating fun patterns) I decided that I would continue to create more cards using these two dies...and traditional colours. Here is what I came up with:  I first used the smallest hexagon to die-cut several hexagons to create my background. I used Elizabeth Craft Designs card stock as well as vellum, and corrugated card. These were then arranged on my card front as shown above. I added stitched details and sequins. Heat embossed the sentiment.  For the bees I used Elizabeth Craft Designs Silk Microfine Glitter - Moonbeam . I also used their velvet adhesive sheet in yellow for the heart and vellum for their wings. As you can see in the photo below - the bees were added using foam tape. I finished the card off with a bow. Hexagons are a fun shape to create with. For my second card ...

Jaded Blossom: Guest Designer Day 1 (June Release Week)

Image
If you didn't know...I was lucky to be asked to guest design for Jaded Blossom . This meant I got a early peak at this months release! So I've been waiting eagerly to share a whole weeks worth of cards and party favors!  Here is Day 1 of release week using the stamp set So Jelly : I decided to I really wanted to create an ocean scene but I didn't want to use traditional blue/green colours. The pinks and purples worked so well with this stamp set which has a whole bunch of 'love' themed sentiments. I also decided to heat embossed the cute jellyfish in white on black card. The card background by itself is quite bright so I needed to add some contrasts - I love how they both pop off the card. Grab the whole release package!  Jaded Blossom have a little special bundle sale during release week. Feel free to check out all the details on their blog .   This Package is only available till Wednesday 11:59pm PST, then will be back up on the store ...

Ink Road Stamps: You're my Lobster

Image
I'm back on the Ink Road Stamps blog with this fun card! Using stamp sets: Between the Lines and The One With All The Stamps . You can check out the full blog post here . This card was created using a number of fun techniques. The first was clear heat embossing on black card! I haven't done this in ages but it creates a textural, glossy fun background.  The lobster was created using the lobster stamp and my silhouette cameo. You'll notice I also stamped on top of the lobster using Between the Lines . I paper pieced the area behind the lobster cut out - I also added machine stitched lines. I finished the card with some sequins, a bow, and a glittery pink heart. Oh and before I forget - if you didn't already know Ink Road Stamps is having a design team call. Check out the details - here! Happy Crafting!

Ink Road Stamps: Friday Feature

Image
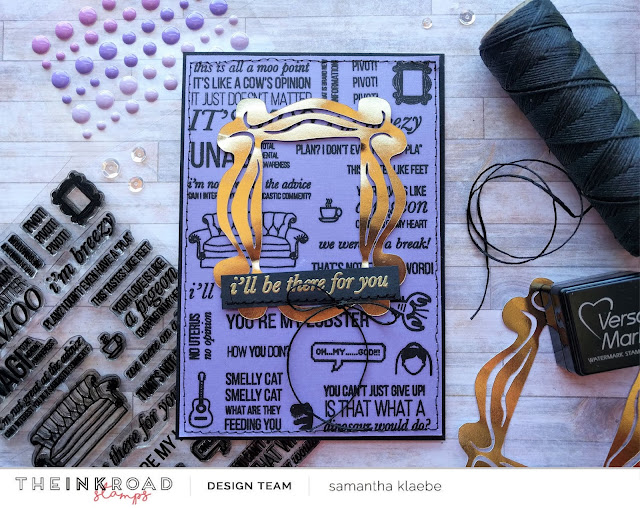
Check out this weeks Friday Feature on the Ink Road Stamps blog - here! So much fun creativity using The One With All The Stamps stamp set! (Bit of a mouth full...but as you can see there is quite a bit of stamps in this set!) At first I wasn't sure how I could properly create a card that showcased all these stamps! It then hit me to just use the whole stamp set as a background stamp. Which is exactly what i did. I used double sided tape and adhered the plastic (stamps facing down) on the bottom side of my MISTI and stamped it on purple card. I created my own cut design using the 'frame' as a guide which I then cut (with my silhouette) using gold card. The 'I'll Be There For You' heat embossed in gold was the perfect sentiment for this friends themed card!  I ended up creating two cards, both very similar. The second card was actually a mistake - the frame I first cut using my silhouette was too big but after I had made the first I really didn't ...

Craftie Cafe: Scream! It's Your Birthday!

Image
It’s that time of year where I seem to be entering the 'birthday' season. I’m even writing this after I spent the afternoon celebrating a 4   year old's birthday party and I’m pretty sure hers is the start of many…including my own three children who will be celebrating their special day a few months apart from each other… So with lots of little kids’ parties on the horizon it’s time to smash out some kid themed birthday cards! Here is what I’ve come up with (for Craftie Café ) using MFT – Monster Sized stamp/die set. The monsters were stamped, coloured (with Copics) and die-cut out before I put them aside to work on my background. The background was cut out strips of corrugated card mixed with black and white strips of card that I had run through an embossing folder (or two) before sewing them back together to create a fun textural effect. I then heat embossed the sentiments in white on black card and assembled my card as shown in the photo above. I used the star s...

Ink Road Stamps: Bloom where you are Planted! (Friday Feature)

Image
It's Friday Feature over at Ink Road Stamp !  Today it's all about Bloom Where you are Planted ! Here is my first card. This is one of those stamp set where one card idea multiplies in to five cards...The set has so many elements and cute sentiments. I used a few of the sentiments to create my backgrounds and the used the 'flower pots' as my feature for each card. As you can see from the detailed photo above I used a few craft products such as glossy accents and clear heat embossing to create a subtle textural effect to the flower pots. There is machine stitched elements for each card and I've embellish them all with colour matching bows and enamel dots. Some of the flowers I chose to colour in with Copic markers others I left white (but coloured with a glitter pen) depending on how much colour was in the background.  The card below was my original idea - I wanted to create a 'wall' of sentiments but since I'm big on texture ...