Posts

Showing posts with the label Craftie Cafe Design Team

Craftin Desert Divas: Shake It Up! (with Fall Fairies)

Image
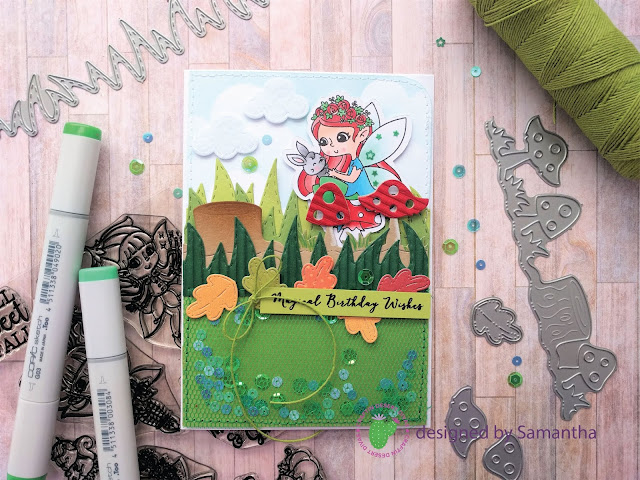
Hello Welcome! This week the Craftin Desert Divas design team has been sharing shaker cards. If this isn't a card you've created before it is a must try.  For my card I decided to create a little pocket using a mesh material. This requires using a sewing machine to stitch a border that holds the sequin bits in but could also be achieved by hand stitching or using double sided tape, then creating a frame with paper to conceal the tape.  Stamp Set:  Craftin Desert Divas: Fall Fairies Dies: Craftin Desert Divas: Mushroom Border Die / Outdoor Landscape Die Copic Markers: Hair: R21/R22/R24/R27/R29 Skin: E000/E00/E02/R20 Wings: G0000/G000/G00 Clothing: B00/B00/B01/B02/B04/G00/G02/G03/G05 Bunny: N0/N01/N03/N05/N06 Have you tried creating a shaker card before? Is there such thing as too many sequins? If you haven't tried this technique before there is a wonderful video up on Craftin Desert Divas blog by design team member Sherry - check out her ...

Craftin Desert Divas: Distress Oxide Inks

Image
Today I have a simple card I'd like to share using the new August release Mushroom Border die from Craftin Desert Divas and Distress Oxide Inks. I don't own very many oxide inks I have about ten but I still wanted to share one way of using these inks to highlight areas of a die-cut. For this card I am using: Candied Apple, Squeezed Lemonade, Peacock Feahers, Cracked Pistachio, Abandoned Coral, and Picked Raspberry.  I used a blending brush (which I prefer over a blending sponge) to apply ink on to my die-cut snails. I used watercolour cardstock as I find that the ink absorbs more evenly and that I don't need to work as hard to get the ink onto my cardstock. I then co-ordinated matching patterned paper to each snail and used the shell die-cut. These were adhered to each snail with foam tape. I added a sentiment from Craftin Desert Divas: Say It Big stamp and embellished my card with enamel dots and a twine bow. I also added a machine stitched border to my card fro...

Craftin Desert Divas: Sneak Peek Release Week (Fall Fairies)

Image
Welcome! I'm loving Craftin Desert Divas August release! Here is a card I created - a little sneak peek at the Fall Fairies stamp set. I've created quite a few scene cards recently but this is one of my favourites this year. I don't often use stencils or distress inks (even though I have the whole set of ink colours!) but with the new Hill Scene 2 stencil I thought I'd challenge myself and try a simple ink blending of clouds in my background. Pumpkin Fairy Copic Markers: YR12/YR15/YR16/YR18 G02/G03/G05/G07 Skin: E000/E00/E01/E02   R20 Wings: R0000/R000/R00/R01 Mushroom Fairy Copic Markers:  Skin: E000/E00/E01/E02  R20 Wings: G0000/G000/G00 B01/B02/B04/B05 R20/R21/R22/R24/R27/R29 In the past I've tried ink blending clouds but never been happy with the results. I did a little testing and asked around for tips on how to improve my technique and I'm happy I challenged myself to try this again! For this card I ink blended on watercolou...

Craftin Desert Diva: You

Image
Hello - have you had a chance to check out any of Craftin Desert Divas release stamps and dies from July? I'm lucky enough to be working on August release stamps right now (you will love them!) but thought I'd share these few cards I created using Crafting Desert Diavs - You . Here is my first card: I'm a big fan of this Mandela - I love the extra bits that allow you to create dimension or create your own patterns like I did in my first set of cards previously blogged - here . With four sweet sentiments I could help but create an additional three cards using the same monochrome idea. Each card was coloured in with Copic markers. Happy Crafting!

Craftin Desert Divas: Skatin By!

Image
Did you miss out seeing Crafting Desert Divas July stamp release ? I've created a second set of cards using the Skatin By stamp set. This time I've combined them with the Star  Galaxy Stencil and used black as my card front. The skating critters really pop off the card! This stamp set is perfect for boys but I know a few girls who would also love a skating themed cards - so I made a few to add to my card stash. Colouring in these critters was easier then I thought it would be - I chose a few colours I knew would work well together...blues, greens, pink and orange. I've listed the Copic markers I used below and you can view a quick colouring video of the bunny I made for a previous card - here . Copic Markers Bunny - W0/W1/W3/W5 Moose - E21/E23/E25 Ram -  W0/W1/W3/W5/W7 Possum -  E21/E23/E25 Fox - R000/R00/R01/R02/R05 Cheeks/Ears R00/R01 Skateboards/Clothes: Y00/Y02/Y04/Y06 B000/B00/B01/B02/B04 YG0000/YG00/YG01/YG03/YG05 YR000/...

Craftie Cafe: You're A Rockstar!

Image
Today I'm sharing a card I created using Taylored Expressions: Cutting Edge Stars Stamp and Die Combo. These sets are great as they come with a co-ordinating die. After a practice colour attempt on the stars I really wanted to make them the feature on my card.  I opted not to use the die for this card this time, but will definitely use it on my next card! This is what I came up with: Card Instructions: Step 1: Stamp the stars four times and fussy cut. (If you have a silhouette or cutting machine use the scan and cut feature to cut the stars out.) Step 2: Colour in with Copic Markers. Step 3: Adhere stars to a black card front. Corner punch the top right corner. Measurement: 5" x 7" Step 4: Heat Emboss the sentiment. Step 5: Add a machine stitched border. (Optional) Step 6: Embellish with sequins and a twine bow. Adhere to a side folding card base. SUPPLIES LIST: Craftie Café Taylored Expression: Cutting Edge Star Stamp and D...

Craftie Cafe: Monster Sized Take #2 (with Video Tutorial)

Image
I’m back sharing a second card I created using My Favorite Things – Monster Sized stamp set. If you didn’t see my first card – check it out here. For this card I decided not to do any colouring! Instead I opted for bright coloured card and a fun black and white background. Here is my card: These monsters are super cute! Since I’ve been getting a lot of positive feedback about how I create my backgrounds I decided I would video the process. VIDEO SUPPLIES LIST: Craftie Café   MFT – Monster Sized MFT – Make Your Mark Background Stamp Lawn Fawn - Stamp Shammy Foam Dots Scorer Other: Tape Runner Scissors/Paper Trimmer White Card Base Cardstock Cuttlebug Twine – Black MISTI Versafine Black Onyx Ink Sewing Machine  Craftie Café Thanks for stopping by! You can grab both these (in stock) items at Craftie Care ! I hope you enjoyed my video tutorial – check back in a couple of weeks for some more card i...

Craftie Cafe: The Same But Different... (Just Add Balloons!)

Image
Recently I’ve been making an effort to use up all the scrap paper that is produced after a card has been made…You know…the strips of paper not big enough to use but too big to throw away! My last few cards for Craftie Café  showcased Jane Doodles:Home Sweet Home stamp and a fun paper piecing technique – but I had so much left over paper that I really didn’t want to throw it away and some of it was already stamped on from an idea that I decided not to do. So today I’m sharing three cards – I decided to do a reversal of colours. Instead of a kraft card base, I’m using a white card base and because I only had strips of paper left I’ve added Lawn Fawns: Party Balloon dies to create this fun birthday card. I’ve also added the sentiment from Jane’s Doodle: Plant stamp set. If you couldn’t guess my inspiration for this card is from the Up movie, I recently watched this with my kids (it’s one of my favourite movies with a sweet story line…) SUPPLIES LIST: ...