Posts

Showing posts from October, 2017

Lil' Inkers: So Prickly

Image
Today I wanted to quickly share three cards I created using Lil Inker stamp set: So Prickly . I used a variety of Gina K inks - the brightest colours possible, and used a fun technique called rock n' roll stamping (with the aid of my MISTI tool).  I've used this technique quite a few times recently - and would highly recommend watching some Youtube videos and giving it a go yourself. I seem to own a lot of 'block' type stamps like this one and it's quite fun and relaxing - stamping away (with your favourite colours) while watching t.v. The final card - I went stamp crazy! I created a background adding the sentiments and a heart to finish it off... Thanks for stopping by - Happy Monday - enjoy the rest of the week! Samantha

Uniquely Creative: Stamp & Colour + 'add ons'

Image
Hey guys excited to be sharing a few more cards I created for Uniquely Creative . This time I'm using their ' add on ' stamp set available along side the October Stamp & Colour kit ! If you missed my first blog post about these awesome new kits - you can click here . Otherwise all the details about what is available in the kits as well as subscription costs can be found here . I created three cards using Woodland Creatures 'add on' stamp set and their sentiments stamp set: Banner Sentiment Builder.   Here are the cards: I had an absolute blast playing with these stamps and the Stamp & Colour kit. I'm really glad that Tracy (and the Uniquely Creative team) have brought these out to the Australian craft community - mainly because I love subscriptions but hate paying international shipping costs! (I know I am not the only one...). So..please go check them out, they're on facebook too so you'd get a lot of ins...

Craftie CafĂ©: WPlus9 – A Banner Baby Card

Image
I’m back again for Craftie CafĂ© – sharing my second lot of baby themed cards. These cards use WPlus9 – Banner Love stamp & the sentiments are from WPlus9 – Happy Gang both currently in stock. I decided that I wanted to create a fun textural element to these cards – recently I’ve been machine sewing on my cards but before I had a sewing machine I hand stitched quite a bit. It’s been ages since I’ve done this and I thought it would be the perfect touch to these banner cards… Here are the cards: I decided to create one card on white and a second card on Kraft – these cards could be tailored to suit any colour really and if you changed up the sentiments you could very easily turn these in to birthday or congratulation card. To create these cards I started by stamping the banners using Lawn Fawn ink (Fish Tank/Mermaid) on white card. Next, I fussy cut them out, then used re-positional tape to temporarily adhered them to my card front. I then drew a fa...

Ink Road Stamps: You Are TOTES Adorbs!

Image
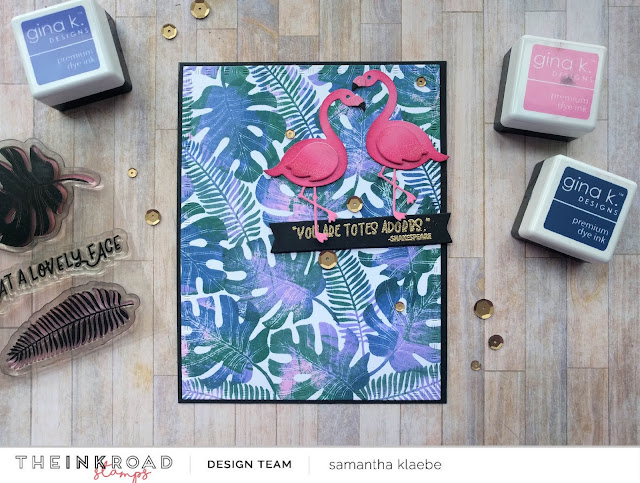
I've got new cards up on the Ink Road Stamps Blog !  Today I'm sharing two cards I created mixing two of their stamps sets (which happen to be my favourite - as I've used both several times now!) The stamps sets are: Frond of You and Call Me Maybe .  Here is the first card: To create this card I used a ‘rock n roll’ stamping technique and a combination of green, blue, pink and purple ink. I continued stamping until the background was full of these awesome leaves. I love this colour combination - and believe it or not found this colour palette on my shopping list which I keep on the fridge! Inspiration is everywhere! I decided to use a flamingo die from my stash to finish the card off – it matched the card perfectly with the “you are totes adorbs” sentiment which I heat embossed in gold on black card. I then embellished the card with some gold sequins. Here is the second card: Again, I used the same technique to create t...

Uniquely Creative: Guest Designer...

Image
During this week I will be sharing a few cards I created guest designing for Uniquely Creative . I've previously designed for Tracy and couldn't say no to this opportunity to play with their very new kits. Now...a little bit about these kits. You can purchase these individually or as a subscription (which does save you a little...and guarantees you happy mail!). You can also just purchase the stamps or dies on their own, so it's quite tailored to everyone's needs. The kits are AU$39.00 and you get lots of goodies to play with!  Here are two cards I created using their Stamp & Colour October kit! These penguins are super cute - remind me a little of the movie Happy Feet... I'll be back during the week featuring a few more cards created using the 'add ons' that are available along side this kit. Happy Crafting! Samantha

Uniquely Creative: Getting ready for Christmas!

Image
Hello!!! Whose ready for Christmas? ME!! I am! :) and by ready I mean I've made a whole bunch of Christmas cards using Uniquely Creative: Christmas Tree die .  Here are the cards : T o create these cards I first die-cut the tree from Christmas pattern paper (left over from last year!). Using vellum I die-cut the tree again, I adhered these (loosely) together and put them aside. Next I die-cut My Little Paper World rectangle nesting dies and then put these through an embossing folder (I used a variety of Christmas themed ones - mostly Couture Creations). I then stamped a few sentiments (Hero Arts CM100) on coloured card, trimmed them down and assembled my card. To add more interest I machine sewed a line down the middle of the tree (overlapping the sentiment banners) before matting my card front to my card base. I also added a few pearls and a star to the tree for decoration.  Thanks for stopping by!  Happy Crafting! S...

Ink Road Stamps: Friday Feature...

Image
Today I'm sharing a few cards I created, which are now also up on Ink Road Stamps blog. Each Friday members in this design team will showcase a featured stamp set. The stamp set on show today is: Ink Road Stamp: Compliments Vol.1 Here are my cards using the stamp set above:  To create these cards I used a resist watercolour technique. I stamped my sentiment and heat embossed it in white. I then applied distress ink to my craft mat, sprayed with water and applied it to areas of my watercolour card. The stamped sentiment resisted the watercolour and created this fun background. I then decided to add interest by sewing (quite randomly) and finished the cards off by heat embossing the sentiment on black card and embellishing with sequins and a few geometric/heart shapes.   Mess aside - this technique was a lot of fun and perfect to showcase this sentiment set. Thanks for stopping by and feel free to check out the Ink Road Stamp...