Craftie Cafe: Happy Halloween with Ghosties!
Let me just
say – I do not celebrate Halloween (though I may or may not buy and snack on a
few of the jumbo sized candy bags that become available in the lead up towards
it.) But … Halloween seems to be gaining popularity here in Australia and let’s
be honest I’m not going to pass up an opportunity to work with Halloweens
awesome colour scheme - oranges, purple and black!
When we were
given this theme from our lovely Craftie Café co-ordinator I wasn’t exactly
sure what I wanted to play with. I was browsing their web store for a few days
before I settled on the Impression Obsession die – Ghosties. I originally
wanted something that could be used again because I’m also one who likes to be
able to get the most out of what I buy especially when it comes to craft
supplies! There were a number of dies that would have worked with the card
design I made – cats, bats, witches, pumpkins, skeleton, even owls! I searched
for these words using the Craftie Café search engine and really had a difficult
time settling on one.
But I
did…and here is the card!
You’re
BOO-tiful, Have a BOO-tiful day! I bought you some BOOS (BOOZE to clarify – we
had a giggle at that one), You are Fab-BOO-lous and then finally we came up
with Have a Spook-tacular Birthday! Perfect! I printed this part out using Word
(Font: Chiller). Below you will find a list of supplies as well as the photo tutorial.
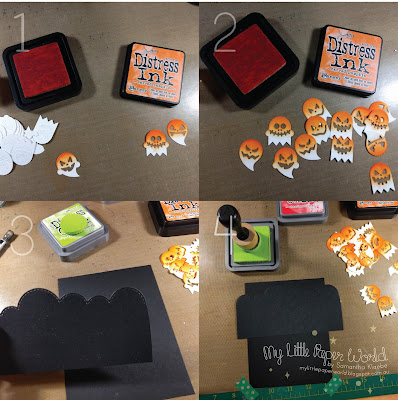
(1) I first
started by die-cutting the ghosties die several times on white card. (2) Next,
using Distress Ink – Carved Pumpkin I blended the ink using a blending tool to
create a gradient look. (3) I used an old Mama Elephant - cloud die that I had
in my stash to create a cloud stencil. (4) I adhered my card front to my craft
mat to prevent it from moving.
(5) I then
proceeded to blend Distress Oxide Ink – Twisted Citron on to my card front
starting from the top (6) and moving the cloud ‘stencil’ down until the card front
was completely covered. (7) I repeated this process again this time starting at
the bottom of my card front using Distress Oxide Ink – Worn Lipstick and (8)
moved the ‘cloud’ stencil up with a larger gap in between each cloud.
(9) Next, I die-cut a large rectangle (10) and then started adhering
the ghosties. (11) It was at this point I felt like the card was missing
something – so for three of the ghosties, I adhered some card (yellow ink
blended into white card) behind them and decided to use 3d foam tape for a few
of them to give the card more interest.
As mentioned before, I printed the sentiment,
trimmed it down then stapled it to my card front (horizontally). I didn’t stop
there! These ghosties were so cute – I added a few eerie eye stickers (I couldn’t
find my googly eye stash!) and used a few star enamel stickers to embellish the
card.
I hope you
enjoyed this little photo tutorial – I absolutely love how Distress Oxide
inks look on dark card stock. I’ve experimented on a few inks (chalk and
pigment) and never got the same result. Definitely a must try product
especially on dark cardstock!
Lawn Fawn – Stamp Shammy
Martha Steward – Mini Scoring Board
Memory Box – Happy Halloween Stamp
Impression Obsession (die) – Ghosties
Distress Oxide Ink – Wilted Violet/Twisted Citron/Worn Lipstick
Anti-Static Pad
Tim Holtz – Stamp Platform
Scissors/Paper Trimmer
Neenah White Cardstock
Black Cardstock
Distress Ink – Carved Pumpkin
Gina K Ink – Wild Dandelion
Blending ToolWow Embossing Powder - White
My Little Paper World – Rectangle Nesting Die TRIBAL
Clear Stamp Block
Heat Tool/Versamark
Cuttlebug
Stapler
Eerie Eye Enamel Stickers
Thanks for
stopping by!
Happy Crafting!
Samantha


Love the ghoties!!
ReplyDelete